mike-neckのブログ

Java or Groovy or Swift or Golang

JUnit5入門(3) - アノテーション

前回の続き

JUnit4同様、JUnit5ではテストのメタ情報や、実行制御はアノテーションを介して行われる。今回はそのアノテーションをまとめる。

JUnit5が提供するアノテーション一覧

アノテーション 役割 説明
@Test メタ情報 付与されたメソッドがテストであることを示す
@TestFactory メタ情報 付与されたメソッドが返す Iterable などがテストであることを示す
@DisplayName メタ情報 テストの表示名を付与する
@Nested メタ情報 テストクラスのインナーテストクラスであることを示す
@Tag 実行制御 テストにタグを付与して
@Tags 実行制御 複数の @Tag をまとめる
@Disabled 実行制御 付与されたテスト/テストクラスは実行されない
@BeforeAll メソッド実行順 付与されたstaticメソッドはテストクラスで最初に実行される
@BeforeEach メソッド実行順 付与されたメソッドは各テスト/インナーテストクラスが実行される前に実行される
@AfterEach メソッド実行順 付与されたメソッドは各テスト/インナーテストクラスが実行された後に実行される
@AfterAll メソッド実行順 付与されたstaticメソッドはテストクラスで最後に実行される

アノテーション詳細

@Test は既に説明済み、 @TestFactory は後ほど説明するとして、その他のアノテーションについて触れておく。

@DisplayName

テストの表示名を設定する。これまでもテスト名でキャメルケースを活用したり、日本語名を用いたりしてテストの内容を説明できるようにしてきたが、メソッド名はシンプルな名前にしておいて、 @DisplayName でよりわかりやすい名前をつけたり、名前に半角ブランクをつけられるようになった。

サンプルコード
@Test
@DisplayName("This test checks int value.")
void checkingInt() {
  assertEquals(2, asInt()); // わざとfail
}
@Test
@DisplayName("This test checks double value.")
void checkingDouble() {
  assertEquals(65535/65536.0, asDouble(), 1/128.0);
}

private static final int ONE = 1;
private static int asInt() {
  return ONE;
}
private static double asDouble() {
  return ONE;
}
実行結果
Failures (1):
  JUnit Jupiter:表示名を変えるテスト:This test checks int value.
    MethodSource [className = 'com.example.ex3.DisplayNameTest', methodName = 'checkingInt', methodParameterTypes = '']
    => org.opentest4j.AssertionFailedError: expected: <2> but was: <1>

また、このようなこともできる。

@Test
@DisplayName("This test checks\n" +
    "int value.")
void checkingInt() {
  assertEquals(2, asInt()); // わざとfail
}
Failures (1):
  JUnit Jupiter:表示名を変えるテスト:This test checkes
int value
    MethodSource [className = 'com.example.ex3.DisplayNameTest', methodName = 'checkingInt', methodParameterTypes = '']
    => org.opentest4j.AssertionFailedError: expected: <2> but was: <1>

テスト名に改行を入れることができるので、次のようにテストに関するドキュメントを記述しておくことが可能になる(ただしこの例はkotlinだが…)。

@Test
@DisplayName("""
文字列のチェック
---

このテストは次のチェックを行う

* 小文字にしたときに同じ文字列であること
* 文字列の長さが同じであること
""")
fun multipleLineDisplayName() {
  String japan = "JAPAN";
  assertAll(
      () -> assertEquals("japan", japan.toLowerCase())
      , () -> assertEquals(5, japan.length())
  );
}

@Nested

複数のテストをまとめて見通しを良くするために Enclosed.class ランナーを用いてインナークラスで整理する手法はJUnit4でもあったが、JUnit5でも利用できる。ただし、JUnit4ではインナークラスはstaticクラスである必要があったのに対して、JUnit5ではstaticクラスを使うことができなくなった。

サンプルコード
@Slf4j
@DisplayName("トップ")
public class NestedClasses {

  @Test
  @DisplayName("トップのテスト")
  void test() {
    log.info("トップのテスト");
  }

  @Nested
  @DisplayName("ミドル")
  class MiddleInner {

    @Test
    @DisplayName("ミドルにあるテスト")
    void test() {
      log.info("ミドルにあるテスト");
    }

    @Nested
    @DisplayName("ボトム")
    class MostInner {

      @Test
      @DisplayName("ボトムのテスト")
      void test() {
        log.info("ボトムのテスト");
      }
    }
  }
}
実行結果
21:24:43.608 [INFO  com.example.ex4.NestedClasses] - トップのテスト
21:24:43.630 [INFO  com.example.ex4.NestedClasses] - ミドルにあるテスト
21:24:43.659 [INFO  com.example.ex4.NestedClasses] - ボトムのテスト

なお、IntelliJで実行すると…
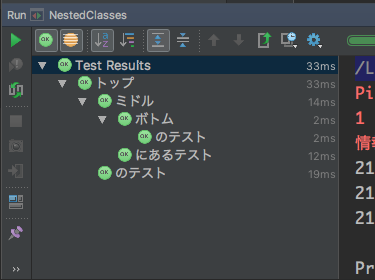
f:id:mike_neck:20170101214329p:plain

@DisplayName が省略される

実行順に関するアノテーション

@BeforeAll などのアノテーションが付与されたテストは次の順序で実行される。

  1. @BeforeAll が付与されたstaticメソッド
  2. @BeforeEach が付与されたメソッド
  3. @Test または @TestFactory が付与されたメソッド
  4. @AfterEach が付与されたメソッド
  5. @BeforeEach が付与されたメソッド
  6. @Test または @TestFactory ...
  7. ...
  8. @AfterEach が付与されたメソッド
  9. @AfterAll が付与されたstaticメソッド

JUnit4のアノテーションと対応は次のようになる。

JUnit4 JUnit5
@BeforeClass @BeforeAll
@Before @BeforeEach
@After @AfterEach
@AfterClass @AfterAll
サンプルコード
@Slf4j
public class ExecutionModel {

  @BeforeAll
  static void beforeAll() throws InterruptedException {
    log.info("beforeAll");
  }

  @AfterAll
  static void afterAll() throws InterruptedException {
    log.info("afterAll");
  }

  @BeforeEach
  void beforeEach() throws InterruptedException {
    log.info("beforeEach");
  }

  @AfterEach
  void afterEach() throws InterruptedException {
    log.info("afterEach");
  }

  @Test
  void testFirst() throws InterruptedException {
    log.info("testFirst");
  }

  @Test
  void testSecond() throws InterruptedException {
    log.info("testSecond");
  }

  @Test
  void testThird() throws InterruptedException {
    log.info("testThird");
  }
}
実行結果
22:15:39.626 [INFO  com.example.ex3.ExecutionModel] - beforeAll
22:15:39.633 [INFO  com.example.ex3.ExecutionModel] - beforeEach
22:15:39.636 [INFO  com.example.ex3.ExecutionModel] - testFirst
22:15:39.642 [INFO  com.example.ex3.ExecutionModel] - afterEach
22:15:39.649 [INFO  com.example.ex3.ExecutionModel] - beforeEach
22:15:39.649 [INFO  com.example.ex3.ExecutionModel] - testSecond
22:15:39.649 [INFO  com.example.ex3.ExecutionModel] - afterEach
22:15:39.651 [INFO  com.example.ex3.ExecutionModel] - beforeEach
22:15:39.651 [INFO  com.example.ex3.ExecutionModel] - testThird
22:15:39.651 [INFO  com.example.ex3.ExecutionModel] - afterEach
22:15:39.653 [INFO  com.example.ex3.ExecutionModel] - afterAll

@Disabled

@Disabled はクラスまたはメソッドに付与してテストを実行させないようにすることができる。JUnit4における @Ignore に相当する。

@DisplayName("除外するテストの例")
public class DisablingTests {

  @Test
  @Disabled
  @DisplayName("動かさないテスト")
  void thisTestWillFail() {
    fail("動かさないテスト");
  }

  @Test
  @DisplayName("動かすテスト")
  void thisTestCanBeRunnable() {
    assertEquals(1, 1);
  }

  @Nested
  @DisplayName("動かすインナークラス")
  class WorkingInner {

    @Test
    @Disabled
    @DisplayName("動かさないテスト")
    void notWorking() {
      fail("not working now.");
    }

    @Test
    @DisplayName("動かすテスト")
    void working() {
      assertTrue(true);
    }
  }

  @Nested
  @Disabled
  @DisplayName("動かさないインナークラス")
  class NotWorking {

    @Test
    @Disabled
    @DisplayName("動かさないテスト")
    void notWorking() {
      fail("not working now.");
    }

    @Test
    @DisplayName("動かすテスト")
    void working() {
      assertTrue(true);
    }
  }
}
実行結果
[         4 containers found      ]
[         1 containers skipped    ]
[         3 containers started    ]
[         0 containers aborted    ]
[         3 containers successful ]
[         0 containers failed     ]
[         6 tests found           ]
[         4 tests skipped         ]
[         2 tests started         ]
[         0 tests aborted         ]
[         2 tests successful      ]
[         0 tests failed          ]

親クラスのテストが2つ(@Disabled 1つ)、 実行する方の子クラスのテストが2つ(@Disabled 1つ)、実行しない(@Disabled)子クラスのテストが2つの合計6つテストがあり、スキップされたのが @Disabled が付与された4つ(1 + 1 + 2)であり、実行されたテストは2つであることが結果からもわかる。

@Tag/@Tags

@Tag は実行制御に関するアノテーションと書いたが、実際の所テストにメタ情報をつけるだけで、IDEから実行する際には特に意味がない(今後タグを識別して実行するようになるかもしれないが…)。gradleなどのplatformからテストを実行する場合にタグ情報をテスト実行制御に用いる。JUnit4における @Categoies に相当する。

サンプルコード
@Slf4j
@DisplayName("タグをつけたテスト")
public class TaggedTests {

  @Test
  @Tag("one")
  @DisplayName("1st というタグを付けたテスト(タグはIDEで実行する上では特に意味がない)")
  void test1st() {
    log.info("1st");
  }

  @Test
  @Tag("two")
  @DisplayName("two という タグ")
  void test2nd() {
    log.info("2nd");
  }

  @Test
  @Tags({
      @Tag("one")
      , @Tag("two")
      , @Tag("three")
  })
  @DisplayName("Tagsでタグたくさん")
  void test3rd() {
    log.info("3rd");
  }

  @Test
  @Tag("one")
  @Tag("three")
  @Tag("this is four")
  @DisplayName("Tagsの中にではなく、Tagをたくさん")
  void test4th() {
    log.info("4th");
  }

  @Test
  @Tag("two")
  @Tag("three")
  @Tag("this is five")
  @DisplayName("Tagsの中にではなく、Tagをたくさん")
  void test5th() {
    log.info("5th");
  }
}
実行結果
22:37:14.794 [INFO  com.example.ex5.TaggedTests] - 1st
22:37:14.806 [INFO  com.example.ex5.TaggedTests] - 3rd
22:37:14.808 [INFO  com.example.ex5.TaggedTests] - 2nd
22:37:14.810 [INFO  com.example.ex5.TaggedTests] - 4th
22:37:14.813 [INFO  com.example.ex5.TaggedTests] - 5th

特に設定をしない限りはすべてのテストが実行される。

JUnit5で @Tag の値に基づき実行を制御するためには、 build.gradlejunitPlatform クロージャー中に次のような記述を行う。

例(twoタグを除外する場合)
junitPlatform {
  filters {
    tags {
      exclude 'two'
    }
  }
}
実行結果
22:59:23.964 [INFO  com.example.ex5.TaggedTests] - 1st
22:59:23.973 [INFO  com.example.ex5.TaggedTests] - 4th

Test run finished after 10321 ms
[         2 containers found      ]
[         0 containers skipped    ]
[         2 containers started    ]
[         0 containers aborted    ]
[         2 containers successful ]
[         0 containers failed     ]
[         2 tests found           ]
[         0 tests skipped         ]
[         2 tests started         ]
[         0 tests aborted         ]
[         2 tests successful      ]
[         0 tests failed          ]

@Tag("two") が付与された test2ndtest3rdtest5th は実行されず、またテストとしてもカウントされてないことに注意したい。

例(excludeinclude を指定した場合)
junitPlatform {
  filters {
    tags {
      exclude 'two'
      include 'three'
    }
  }
}
実行結果
23:04:13.315 [INFO  com.example.ex5.TaggedTests] - 4th

two が付与されておらず three が付与されている test4th が実行された。

サンプルコードはこちら

github.com

github.com

github.com


つづく

JUnit5入門(2) - アサーション

前回 の続き

今回は値の比較、アサーションについて。


JUnit5が提供するアサーション

JUnit5はJUnit4とほぼ同等のAssertion機能を提供している。また、より高度なAssertionを求める場合は、サードパーティライブラリーの利用を勧めている。

JUnit5のAssertionの基本的なもの

以下の通り。なお、assertThat はなくなった。また、メッセージはこれまでは引数の最初に渡していたが、引数の最後に渡すようになった。

メソッド 比較内容
Assertions#assertEquals 左(期待値)と右(実際の値)が等しいことを確認する
Assertions#assertNotEquals 左(期待値)と右(実際の値)が等しくないことを確認する
Assertions#assertTrue 値が true であることを確認する
Assertions#assertFalse 値が false であることを確認する
Assertions#assertSame 左(期待するオブジェクト)と右(実際のオブジェクト)が同じインスタンスであることを確認する
Assertions#assertNotSame 左(期待しないオブジェクト)と右(実際のオブジェクト)が同じインスタンスでないことを確認する
Assertions#assertNull 値が null であることを確認する
Assertions#assertNotNull 値が null でないことを確認する
Assertions#assertArrayEquals 左の配列(期待値)と右の配列(実際の値)が順番、値ともに等しい配列であることを確認する
サンプルコード
@Test
void assertVariation() {
  assertEquals("2nd test", getText(), "メッセージは3つめの引数");
  assertEquals("2nd test", getText(), () -> "メッセージは Supplier でも渡せる");
  assertTrue(true, "これは [true]");
  assertFalse(false); // メッセージなし
  assertNotEquals("いろいろなassertion", getText());
  assertNotSame(new Something(), new Something(), () -> "notSame は reference の比較");
  assertSame(something, something);
  assertNotSame(something, new Something(), () -> "型が違うけど比較できる...");
  assertNull(returnsNull());
  assertNotNull(getText());
  assertArrayEquals(new int[]{1,2,3,4,5,6,7,8}, intArray(), () -> "配列のテスト");
}

private static final Object something = new Object();
private static class Something {}
@NotNull
private String getText() {
    return "2nd test";
}
@Nullable
private String returnsNull() {
  return null;
}
@NotNull
private static int[] intArray() {
  return new int[]{1, 2, 3, 4, 5, 6, 7, 8};
}

追加になったAssertion

Iterable の比較をおこなうassertionメソッド(Assertions#assertIterableEquals)が追加された。

サンプルコード
@Test
void assertionForCollections() {
  assertIterableEquals(Arrays.asList(
      new Identity<>(0)
      , new Identity<>(1)
      , new Identity<>(2)
      , new Identity<>(3)
  ), identityList());
}

@Data @RequiredArgsConstructor
static class Identity<T> {
  private final T id;
}
@NotNull
private List<Identity> identityList() {
  return IntStream.range(0, 4)
      .mapToObj(Identity::new)
      .collect(toList());
}

便利なAssertion

Assertions#assertAll という複数のAssertをサポートするメソッドが追加された。

可変長引数で渡された Executable(Assertionの式)または Stream<Executable> を受取りすべてのAssertionをすべて実行し、どれがfailしたかエラー表示する。

サンプルコード
@Test
void assertAllThatFails() {
  Stream<Executable> tests = IntStream.rangeClosed(1, 7)
      .mapToObj(i -> () -> {
        log.info("This is assertion[{}]", i);
        assertEquals(i, i + (i % 3 == 0? 1 : 0), () -> "assertion" + i);
      });
  assertAll(tests);
}
実行結果
19:06:46.940 [INFO  com.example.ex2.FourthTest] - This is assertion[1]
19:06:46.945 [INFO  com.example.ex2.FourthTest] - This is assertion[2]
19:06:46.946 [INFO  com.example.ex2.FourthTest] - This is assertion[3]
19:06:46.947 [INFO  com.example.ex2.FourthTest] - This is assertion[4]
19:06:46.947 [INFO  com.example.ex2.FourthTest] - This is assertion[5]
19:06:46.948 [INFO  com.example.ex2.FourthTest] - This is assertion[6]
19:06:46.948 [INFO  com.example.ex2.FourthTest] - This is assertion[7]

Failures (1):
  JUnit Jupiter:FourthTest:assertAllThatFails()
    MethodSource [className = 'com.example.ex2.FourthTest', methodName = 'assertAllThatFails', methodParameterTypes = '']
    => org.opentest4j.MultipleFailuresError: Multiple Failures (2 failures)
        assertion3 ==> expected: <3> but was: <4>
        assertion6 ==> expected: <6> but was: <7>

なお、複数のAssertionを実行してもテストは1としてしかカウントされない。

JUnit5のAssumption

Assumptionは条件に合致した場合のみテストを実行し、条件に合致しない場合にはテストをスキップするヘルパーメソッド。JUnit4にあった assumeThatassumeNotNullassumeNoException がなくなり、 assumeTrue が残った。また、 assumeFalseassumingThat が追加された。

サンプルコード
@Test
void thisTestDoNotRunOnSunday() {
  final DayOfWeek dayOfWeek = today().getDayOfWeek();
  assumeFalse(SUNDAY.equals(dayOfWeek));
  log.info("日曜以外");
  assertFalse("日".equals(dayOfWeek.getDisplayName(TextStyle.SHORT, Locale.JAPAN)));
}
@Test
void thisTestRunOnSunday() {
  final DayOfWeek dayOfWeek = today().getDayOfWeek();
  assumeTrue(SUNDAY.equals(dayOfWeek));
  log.info("日曜");
  assertEquals("日", dayOfWeek.getDisplayName(TextStyle.SHORT, Locale.JAPAN));
}

private static final ZoneId ZONE_ID = ZoneId.of("Asia/Tokyo");
@NotNull @Contract(pure = true)
private static LocalDate today() {
  return LocalDate.now(ZONE_ID);
}
実行結果
Test run finished after 10468 ms
[         2 containers found      ]
[         0 containers skipped    ]
[         2 containers started    ]
[         0 containers aborted    ]
[         2 containers successful ]
[         0 containers failed     ]
[         1 tests found           ]
[         0 tests skipped         ]
[         1 tests started         ]
[         1 tests aborted         ]
[         0 tests successful      ]
[         0 tests failed          ]

assumingThat は最初の引数の BooleanSuppliertrue を返した場合のみ後続の Executable(Assertion)が実行される。

assumingThat のサンプルコード
@Test
void thisTestDoNotRunOnSunday() {
  final DayOfWeek dayOfWeek = today().getDayOfWeek();
  assumingThat(
      () -> !SUNDAY.equals(dayOfWeek)
      , () -> assertFalse("日".equals(dayOfWeek.getDisplayName(TextStyle.SHORT, Locale.JAPAN)))
  );
}
@Test
void thisTestRunOnSunday() {
  final DayOfWeek dayOfWeek = today().getDayOfWeek();
  assumingThat(
      () -> SUNDAY.equals(dayOfWeek)
      , () -> assertEquals("日", dayOfWeek.getDisplayName(TextStyle.SHORT, Locale.JAPAN))
  );
}
実行結果
Test run finished after 10261 ms
[         2 containers found      ]
[         0 containers skipped    ]
[         2 containers started    ]
[         0 containers aborted    ]
[         2 containers successful ]
[         0 containers failed     ]
[         2 tests found           ]
[         0 tests skipped         ]
[         2 tests started         ]
[         0 tests aborted         ]
[         2 tests successful      ]
[         0 tests failed          ]

コードはこちらから

github.com

How to run test class whose name doesn't end with Test in JUnit5 with Gradle.

JUnit5 publishes junit-platform-gradle-plugin. With it you can run JUnit5 tests with gradle. But if you don't give Test at the end of the test class name, this plugin ignores to run it. If you want to run a test classes whose name don't end with Test, ex. FooSpec, BarTestCase, you have to specify a name pattern of them via includeClassName(or includeClassNames) in junitPlatform.filters Closure.

example
buildscript {
  repositories {
    mavenCentral()
  }
  dependencies {
    classpath "org.junit.platform:junit-platform-gradle-plugin:1.0.0-M3"
  }
}

apply plugin: 'java'
apply plugin: 'org.junit.platform.gradle.plugin'

repositories {
  mavenCentral()
  jcenter()
}

dependencies {
  testCompile "org.junit.jupiter:junit-jupiter-api:5.0.0-M3"
  testRuntime "org.junit.jupiter:junit-jupiter-engine:5.0.0-M3"
}

// specify your test class names here
junitPlatform {
  filters {
    includeClassNamePattern '^.*TestCase$'
    includeClassNamePatterns '^.*Spec$', '^.*Tests?$' 
  }
}

With this configuration, you can run tests whose name ends with Test, Tests, Spec, TestCase.

JUnit5入門(1) - テストクラスの作成とテストの実行

年末にかけてJUnit5(junit-jupiter)をいじったのでまとめ。

使い方的な話はQiitaにある記事のほうが詳しいかもしれない…

qiita.com

qiita.com

qiita.com

qiita.com


JUnit5ライブラリーの導入

テストコンパイルスコープにjunit-jupiter-api、テストランタイムにjunit-jupiter-engineを用いるようにする。

build.gradle
repositories {
  mavenCentral()
  jcenter()
}

dependencies {
  testCompile "org.junit.jupiter:junit-jupiter-api:5.0.0-M3"
  testRuntime "org.junit.jupiter:junit-jupiter-engine:5.0.0-M3"
}
pom.xml
<dependency>
  <groupId>org.junit.jupiter</groupId>
  <artifactId>junit-jupiter-api</artifactId>
  <version>5.0.0-M3</version>
  <scope>test</scope>
</dependency>
<dependency>
  <groupId>org.junit.jupiter</groupId>
  <artifactId>junit-jupiter-engine</artifactId>
  <version>5.0.0-M3</version>
  <scope>test</scope>
</dependency>

JUnit5のテストクラスとテストメソッドの作り方

JUnit4とほとんど変わらない。プレーンなクラスを作って、 @Test アノテーションをテストメソッドに付加するだけで実行してくれる。

サンプルコード
import lombok.extern.slf4j.Slf4j;
import org.junit.jupiter.api.Test;

@Slf4j
public class SimpleTest {

    @Test
    void firstTest() {
        log.info("1st test");
    }
}

@Test アノテーションを付与するメソッドは、staticメソッドではなく、またprivateなメソッドでない必要がある。

実行結果
1 01, 2017 12:55:22 午後 org.junit.platform.launcher.core.ServiceLoaderTestEngineRegistry loadTestEngines
情報: Discovered TestEngines with IDs: [junit-jupiter]
12:55:28.796 [INFO  com.example.ex1.SimpleTest] - 1st test

コードサンプル


JUnit5の実行方法

IDEからの実行

IntelliJ IDEA

デフォルトの状態でJUnit5を実行できるようになっている。なお、実行方法はこれまでと変わらない。

f:id:mike_neck:20170101154113p:plain

テストクラスの左側にある実行ボタンをクリックして、メニューから「Run クラス名 」を実行する。

f:id:mike_neck:20170101154237p:plain

f:id:mike_neck:20170101154313p:plain

Eclipse

知らない…ごめん…

Bug 488566 - [JUnit][JUnit 5] Add support for JUnit 5を読むかぎり、Eclipse 4.7 M4にてJunit5のサポートがあるようです。

Netbeans

知らないし、ググっても出てこないけど、console-launcherは単なるjavaアプリケーションなので必要なライブラリーをclasspathに指定しつつ、console-launcherを起動すれば実行できる。

Gradleからの実行

Gradleにjunit-platformプラグインを導入して、 junitPlatformTest タスクを実行するとテストを実行できる。

build.gradle
buildscript {
  repositories {
    mavenCentral()
  }
  dependencies {
    classpath "org.junit.platform:junit-platform-gradle-plugin:1.0.0-M3"
  }
}

apply plugin: 'java'
apply plugin: 'org.junit.platform.gradle.plugin'
実行結果

junitPlatformTest は長いので jPT で指定することもできる。

$ gradle jPT
:compileJava
:processResources
:classes
:compileTestJava
:processTestResources
:testClasses
:junitPlatformTest
12 31, 2016 9:39:27 午後 org.junit.platform.launcher.core.ServiceLoaderTestEngineRegistry loadTestEngines
情報: Discovered TestEngines with IDs: [junit-jupiter]
21:39:33.471 [INFO  com.example.ex1.SimpleTest] - 1st test
Test run finished after 11642 ms
[          1 containers found      ]
[         0 containers skipped    ]
[         1 containers started    ]
[         0 containers aborted    ]
[         1 containers successful ]
[         0 containers failed     ]
[         1 tests found           ]
[         0 tests skipped         ]
[         1 tests started         ]
[         0 tests aborted         ]
[         1 tests successful      ]
[         0 tests failed          ]

BUILD SUCCESSFUL

Total time: 12.576 secs

注意点

GradleでJunit5を起動するときに注意したい所は次の点

  • Gradleのバージョンは2.5以上が必要
  • junit-platformjunit-jupiter とがややこしい
    • コンパイル時に必要なライブラリーのgroupが org.junit.jupiter で、gradleのプラグインのほうのgroupが org.junit.platform
    • junit-jupiter のバージョン(いわゆるJUnit5のバージョン)が 5.0.0.-M3junit-platform のバージョン(つまりgradleプラグインのバージョン)が 1.0.0-M3
  • 独自のJUnit5を走らせるタスクを作るのが非常に面倒くさい
    • junitPlatformTest タスクは単なる JavaExec タスクなので、同じようなものを作ろうとするとこれと同じようなコードを書かないといけない
      • まあ、そうではあるんだけど、gradleのissueにJunit5関連のissueが立っているので、gradleから公式のタスクが出るかもしれない
  • デフォルトでクラス名が Test あるいは Tests で終わるものだけをテストクラスとして読み取るようになっている(これとかこれなど)
    • そのため FooSpec というクラスに @Test を付与してもgradleからは起動できない
    • これを回避するためには次のように junitPlatform.filters.includeClassNamePattern あるいは junitPlatform.filters.includeClassNamePatterns に実行したいクラス名のパターンを指定する必要がある
junitPlatform {
  filters {
    includeClassNamePattern '^.*Spec$'
    // あるいは
    includeClassNamePatterns '^.*Spec$', '^.*Tests?$' 
  }
}