前回の続き
JUnit4同様、JUnit5ではテストのメタ情報や、実行制御はアノテーションを介して行われる。今回はそのアノテーションをまとめる。
JUnit5が提供するアノテーション一覧
| アノテーション | 役割 | 説明 |
|---|---|---|
@Test |
メタ情報 | 付与されたメソッドがテストであることを示す |
@TestFactory |
メタ情報 | 付与されたメソッドが返す Iterable などがテストであることを示す |
@DisplayName |
メタ情報 | テストの表示名を付与する |
@Nested |
メタ情報 | テストクラスのインナーテストクラスであることを示す |
@Tag |
実行制御 | テストにタグを付与して |
@Tags |
実行制御 | 複数の @Tag をまとめる |
@Disabled |
実行制御 | 付与されたテスト/テストクラスは実行されない |
@BeforeAll |
メソッド実行順 | 付与されたstaticメソッドはテストクラスで最初に実行される |
@BeforeEach |
メソッド実行順 | 付与されたメソッドは各テスト/インナーテストクラスが実行される前に実行される |
@AfterEach |
メソッド実行順 | 付与されたメソッドは各テスト/インナーテストクラスが実行された後に実行される |
@AfterAll |
メソッド実行順 | 付与されたstaticメソッドはテストクラスで最後に実行される |
各アノテーション詳細
@Test は既に説明済み、 @TestFactory は後ほど説明するとして、その他のアノテーションについて触れておく。
@DisplayName
テストの表示名を設定する。これまでもテスト名でキャメルケースを活用したり、日本語名を用いたりしてテストの内容を説明できるようにしてきたが、メソッド名はシンプルな名前にしておいて、 @DisplayName でよりわかりやすい名前をつけたり、名前に半角ブランクをつけられるようになった。
サンプルコード
@Test
@DisplayName("This test checks int value.")
void checkingInt() {
  assertEquals(2, asInt()); // わざとfail
}
@Test
@DisplayName("This test checks double value.")
void checkingDouble() {
  assertEquals(65535/65536.0, asDouble(), 1/128.0);
}

private static final int ONE = 1;
private static int asInt() {
  return ONE;
}
private static double asDouble() {
  return ONE;
}
実行結果
Failures (1):
  JUnit Jupiter:表示名を変えるテスト:This test checks int value.
    MethodSource [className = 'com.example.ex3.DisplayNameTest', methodName = 'checkingInt', methodParameterTypes = '']
    => org.opentest4j.AssertionFailedError: expected: <2> but was: <1>
また、このようなこともできる。
@Test
@DisplayName("This test checks\n" +
    "int value.")
void checkingInt() {
  assertEquals(2, asInt()); // わざとfail
}
Failures (1):
  JUnit Jupiter:表示名を変えるテスト:This test checkes
int value
    MethodSource [className = 'com.example.ex3.DisplayNameTest', methodName = 'checkingInt', methodParameterTypes = '']
    => org.opentest4j.AssertionFailedError: expected: <2> but was: <1>
テスト名に改行を入れることができるので、次のようにテストに関するドキュメントを記述しておくことが可能になる(ただしこの例はkotlinだが…)。
@Test
@DisplayName("""
文字列のチェック
---

このテストは次のチェックを行う

* 小文字にしたときに同じ文字列であること
* 文字列の長さが同じであること
""")
fun multipleLineDisplayName() {
  String japan = "JAPAN";
  assertAll(
      () -> assertEquals("japan", japan.toLowerCase())
      , () -> assertEquals(5, japan.length())
  );
}
@Nested
複数のテストをまとめて見通しを良くするために Enclosed.class ランナーを用いてインナークラスで整理する手法はJUnit4でもあったが、JUnit5でも利用できる。ただし、JUnit4ではインナークラスはstaticクラスである必要があったのに対して、JUnit5ではstaticクラスを使うことができなくなった。
サンプルコード
@Slf4j
@DisplayName("トップ")
public class NestedClasses {

  @Test
  @DisplayName("トップのテスト")
  void test() {
    log.info("トップのテスト");
  }

  @Nested
  @DisplayName("ミドル")
  class MiddleInner {

    @Test
    @DisplayName("ミドルにあるテスト")
    void test() {
      log.info("ミドルにあるテスト");
    }

    @Nested
    @DisplayName("ボトム")
    class MostInner {

      @Test
      @DisplayName("ボトムのテスト")
      void test() {
        log.info("ボトムのテスト");
      }
    }
  }
}
実行結果
21:24:43.608 [INFO  com.example.ex4.NestedClasses] - トップのテスト
21:24:43.630 [INFO  com.example.ex4.NestedClasses] - ミドルにあるテスト
21:24:43.659 [INFO  com.example.ex4.NestedClasses] - ボトムのテスト
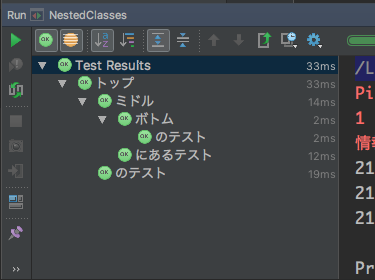
なお、IntelliJで実行すると…

@DisplayName が省略される
実行順に関するアノテーション
@BeforeAll などのアノテーションが付与されたテストは次の順序で実行される。
@BeforeAllが付与されたstaticメソッド@BeforeEachが付与されたメソッド@Testまたは@TestFactoryが付与されたメソッド@AfterEachが付与されたメソッド@BeforeEachが付与されたメソッド@Testまたは@TestFactory...- ...
@AfterEachが付与されたメソッド@AfterAllが付与されたstaticメソッド
JUnit4のアノテーションと対応は次のようになる。
| JUnit4 | JUnit5 |
|---|---|
@BeforeClass |
@BeforeAll |
@Before |
@BeforeEach |
@After |
@AfterEach |
@AfterClass |
@AfterAll |
サンプルコード
@Slf4j
public class ExecutionModel {

  @BeforeAll
  static void beforeAll() throws InterruptedException {
    log.info("beforeAll");
  }

  @AfterAll
  static void afterAll() throws InterruptedException {
    log.info("afterAll");
  }

  @BeforeEach
  void beforeEach() throws InterruptedException {
    log.info("beforeEach");
  }

  @AfterEach
  void afterEach() throws InterruptedException {
    log.info("afterEach");
  }

  @Test
  void testFirst() throws InterruptedException {
    log.info("testFirst");
  }

  @Test
  void testSecond() throws InterruptedException {
    log.info("testSecond");
  }

  @Test
  void testThird() throws InterruptedException {
    log.info("testThird");
  }
}
実行結果
22:15:39.626 [INFO  com.example.ex3.ExecutionModel] - beforeAll
22:15:39.633 [INFO  com.example.ex3.ExecutionModel] - beforeEach
22:15:39.636 [INFO  com.example.ex3.ExecutionModel] - testFirst
22:15:39.642 [INFO  com.example.ex3.ExecutionModel] - afterEach
22:15:39.649 [INFO  com.example.ex3.ExecutionModel] - beforeEach
22:15:39.649 [INFO  com.example.ex3.ExecutionModel] - testSecond
22:15:39.649 [INFO  com.example.ex3.ExecutionModel] - afterEach
22:15:39.651 [INFO  com.example.ex3.ExecutionModel] - beforeEach
22:15:39.651 [INFO  com.example.ex3.ExecutionModel] - testThird
22:15:39.651 [INFO  com.example.ex3.ExecutionModel] - afterEach
22:15:39.653 [INFO  com.example.ex3.ExecutionModel] - afterAll
@Disabled
@Disabled はクラスまたはメソッドに付与してテストを実行させないようにすることができる。JUnit4における @Ignore に相当する。
@DisplayName("除外するテストの例")
public class DisablingTests {

  @Test
  @Disabled
  @DisplayName("動かさないテスト")
  void thisTestWillFail() {
    fail("動かさないテスト");
  }

  @Test
  @DisplayName("動かすテスト")
  void thisTestCanBeRunnable() {
    assertEquals(1, 1);
  }

  @Nested
  @DisplayName("動かすインナークラス")
  class WorkingInner {

    @Test
    @Disabled
    @DisplayName("動かさないテスト")
    void notWorking() {
      fail("not working now.");
    }

    @Test
    @DisplayName("動かすテスト")
    void working() {
      assertTrue(true);
    }
  }

  @Nested
  @Disabled
  @DisplayName("動かさないインナークラス")
  class NotWorking {

    @Test
    @Disabled
    @DisplayName("動かさないテスト")
    void notWorking() {
      fail("not working now.");
    }

    @Test
    @DisplayName("動かすテスト")
    void working() {
      assertTrue(true);
    }
  }
}
実行結果
[         4 containers found      ]
[         1 containers skipped    ]
[         3 containers started    ]
[         0 containers aborted    ]
[         3 containers successful ]
[         0 containers failed     ]
[         6 tests found           ]
[         4 tests skipped         ]
[         2 tests started         ]
[         0 tests aborted         ]
[         2 tests successful      ]
[         0 tests failed          ]
親クラスのテストが2つ(@Disabled 1つ)、 実行する方の子クラスのテストが2つ(@Disabled 1つ)、実行しない(@Disabled)子クラスのテストが2つの合計6つテストがあり、スキップされたのが @Disabled が付与された4つ(1 + 1 + 2)であり、実行されたテストは2つであることが結果からもわかる。
@Tag/@Tags
@Tag は実行制御に関するアノテーションと書いたが、実際の所テストにメタ情報をつけるだけで、IDEから実行する際には特に意味がない(今後タグを識別して実行するようになるかもしれないが…)。gradleなどのplatformからテストを実行する場合にタグ情報をテスト実行制御に用いる。JUnit4における @Categoies に相当する。
サンプルコード
@Slf4j
@DisplayName("タグをつけたテスト")
public class TaggedTests {

  @Test
  @Tag("one")
  @DisplayName("1st というタグを付けたテスト(タグはIDEで実行する上では特に意味がない)")
  void test1st() {
    log.info("1st");
  }

  @Test
  @Tag("two")
  @DisplayName("two という タグ")
  void test2nd() {
    log.info("2nd");
  }

  @Test
  @Tags({
      @Tag("one")
      , @Tag("two")
      , @Tag("three")
  })
  @DisplayName("Tagsでタグたくさん")
  void test3rd() {
    log.info("3rd");
  }

  @Test
  @Tag("one")
  @Tag("three")
  @Tag("this is four")
  @DisplayName("Tagsの中にではなく、Tagをたくさん")
  void test4th() {
    log.info("4th");
  }

  @Test
  @Tag("two")
  @Tag("three")
  @Tag("this is five")
  @DisplayName("Tagsの中にではなく、Tagをたくさん")
  void test5th() {
    log.info("5th");
  }
}
実行結果
22:37:14.794 [INFO  com.example.ex5.TaggedTests] - 1st
22:37:14.806 [INFO  com.example.ex5.TaggedTests] - 3rd
22:37:14.808 [INFO  com.example.ex5.TaggedTests] - 2nd
22:37:14.810 [INFO  com.example.ex5.TaggedTests] - 4th
22:37:14.813 [INFO  com.example.ex5.TaggedTests] - 5th
特に設定をしない限りはすべてのテストが実行される。
JUnit5で @Tag の値に基づき実行を制御するためには、 build.gradle の junitPlatform クロージャー中に次のような記述を行う。
例(twoタグを除外する場合)
junitPlatform {
  filters {
    tags {
      exclude 'two'
    }
  }
}
実行結果
22:59:23.964 [INFO  com.example.ex5.TaggedTests] - 1st
22:59:23.973 [INFO  com.example.ex5.TaggedTests] - 4th

Test run finished after 10321 ms
[         2 containers found      ]
[         0 containers skipped    ]
[         2 containers started    ]
[         0 containers aborted    ]
[         2 containers successful ]
[         0 containers failed     ]
[         2 tests found           ]
[         0 tests skipped         ]
[         2 tests started         ]
[         0 tests aborted         ]
[         2 tests successful      ]
[         0 tests failed          ]
@Tag("two") が付与された test2nd 、 test3rd 、 test5th は実行されず、またテストとしてもカウントされてないことに注意したい。
例(exclude 、 include を指定した場合)
junitPlatform {
  filters {
    tags {
      exclude 'two'
      include 'three'
    }
  }
}
実行結果
23:04:13.315 [INFO com.example.ex5.TaggedTests] - 4th
two が付与されておらず three が付与されている test4th が実行された。
サンプルコードはこちら
つづく